DIY Succulent Letters

Love our succulent letters? Sweet - so do we!
Below is a simple DIY tutorial of how to assemble and plant your own succulent letters. You can also visit our DIY succulent wreath making post, here.
Tools needed, all can be purchased at our shop (or found somewhere in your junk drawer):
- Thick nail or narrow screw driver
- Metal clips or staples
- Clippers (We love our T-600's)
Step 1. Purchase your letter from the shop or by emailing us, shop@gardenapothecary.com.
Step 2. Gather small, but sturdy succulent cuttings. This is the time to make friends with that neighbor who has those fabulous succulents, and ask for a cutting or ten. Bake a cake, bring them a puppy, pretend to be a girl scout - I don't care, just get those gorgeous cuttings! A variety of colorful ones is preferred. You can also visit a nursery to purchase one big succulent (one that has many off-shoots or babies) and then remove the smaller pieces to use. Simply look for sturdy succulents that have thin stems. You don't want to use a succulent that falls apart easily or has a stem with a diameter larger then a pencil. You will need anywhere from 12 - 35 cuttings, depending on your letter and desired design. Some growers like to dry their cuttings out prior to using them in wreaths or letters, which is a standard propagation technique. I don't find that I need to do that, so I plant fresh.

Step 3. Ready your tools and letter. Lay your letter flat and saturate it with water for a minute or less, allowing the water to be soaked up by the moss. You don't want to over water it, or the moss will be difficult to work with. You want moist, springy moss.
Step 4. Trim the lower leaves off of your cutting, including any dried bits or debris. You want a clean stem that is about half an inch long.
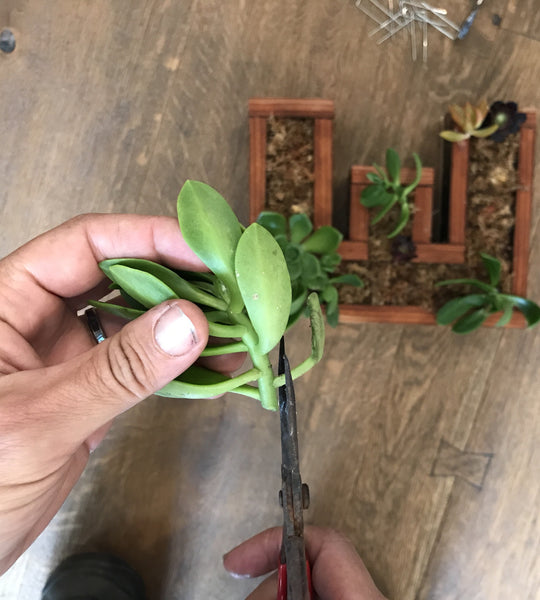
Step 5. Start Planting! Pick your largest succulents and arrange them randomly on the letter. Once these are planted and secure, you can add the smaller cuttings to surround and fill in empty space. Once your larger pieces are picked out, take a nail or screw driver and make a little hole in the moss, gently widening the moss. Well watered moss should be soft but springy, and will bounce back (thus holding the cutting in place). Insert the cutting stem in the hole, and gently twist a bit to secure it in. These letters are lined with metal wire that keeps the moss in place, so don't worry about accidentally pulling out the moss.

Step 6. If the cutting is still wobbly in the hole, you can secure it with metal clips or staples. You can also use these for gently securing smaller cuttings that otherwise would break in your hand if you tried to insert in firm moss. You can also use clips for securing succulent cuttings that have no stem. Remember, these are cuttings, so even placing them on moss will prompt them to quickly take root. The clips act as support until they fully root on their own. You're not piercing the succulent or it's leaf, you are just placing one or two clips around it to gently hold it onto the moss. Often times, you only need one clip per cutting.


Step 7. From there, you can thoroughly fill in as you see fit. I tend to make mine very full, but some people would rather they grow in over time, so as not to over power the letter's shape. Once your letter is complete, lay flat in a filtered sunny location for 3-6 weeks, or until the cuttings have started to take root, prior to hanging. Do not water during this time - or if you live in a hot/dry location, water very lightly once a week or so. From 6-8 weeks, your cuttings will continue root, you can gently water every week or week and a half.
Care - succulents like to grow outside in full sun to part shade, depending on your location. Generally speaking, you can take the letter down, lay flat and soak with a hose 2-3 times a month. You can fertilize with a liquid organic all-purpose fertilizer once a month or less. Feel free to trim, clean dead leaves or replant as you see fit. I tend to my letters about 4-6 times a year, trimming and replacing for aesthetics and health. If you do not know where to place your letter, feel free to email us a photo of your wall or garden for assistance and more in-depth care instructions. You can have these inside for up to one week, before they will want to be outside again. If you'd rather have us do the planting, we can do that as well. Simply visit us at the shop, or email us.
329 Main Street, Half Moon Bay, CA
shop@gardenapothecary.com